Automated Plex Server Setup (Windows)
Once this is done you can open up Plex on any device in your network and watch any TV shows or movies you have added. Any unreleased movies or TV episodes you have added will be automatically downloaded upon release. Total cost (for provider and indexer) - $47USD($79NZD) per year. You don't need Plex Pass to watch within your local network, but to share your library remotely you'll need Plex Pass.
Any questions email [email protected] or you can comment on this reddit post.
Folder structure is important for the apps to work correctly with each other. The basic gist is you want separate folders for downloads and sorted media, with sub-folders for completed tv and movies. Setup your folders like this in Windows (I am using E: drive as an example)
 E:\homeserver\media\movies
 E:\homeserver\media\tv
 E:\homeserver\downloads\complete\movies
 E:\homeserver\downloads\complete\tv
 E:\homeserver\downloads\incomplete
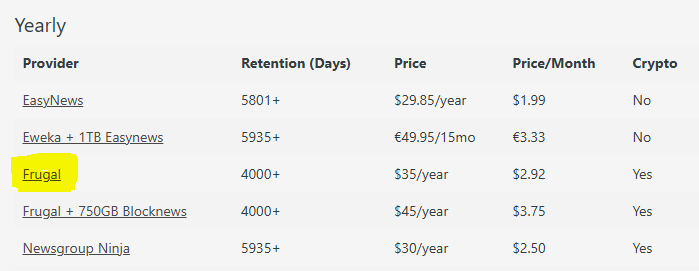
1) First we need a provider. This is essentially a server that holds the files we'll be downloading. Go to this link https://www.reddit.com/r/usenet/wiki/providerdeals/ and click on the link under yearly for Frugal ($35/yr) and follow the sign-up process, Frugal has the best speeds for NZ/Aus, and are otherwise good internationally. Eweka is another good general option. They will send you an email with your username and password, we will need those in the next step.
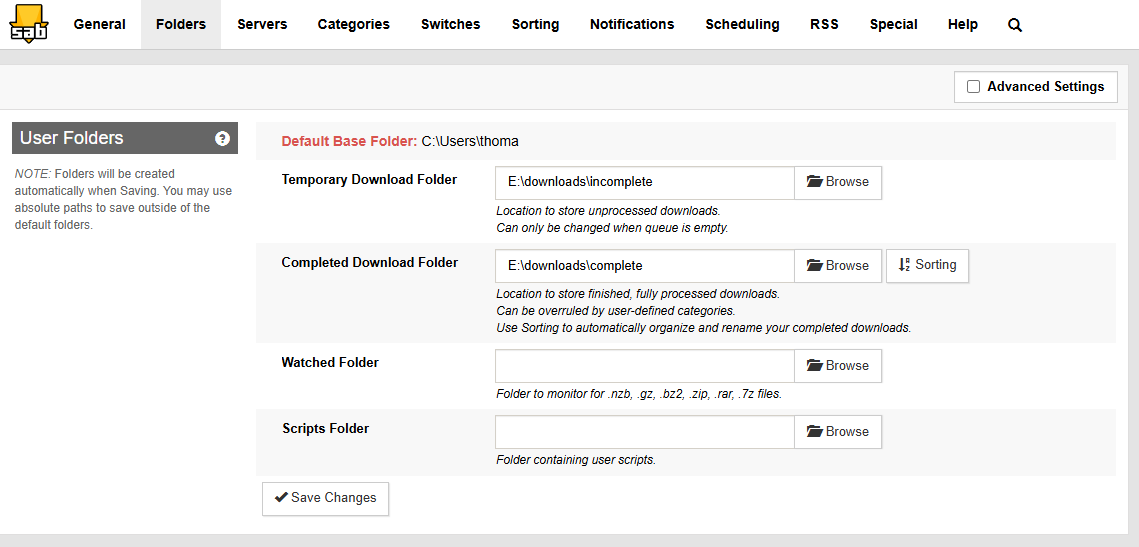
2) Download and install SABnzbd (download client): https://sabnzbd.org/ Tick “Run at Startup” when installing, for everything else keep the default options. Start SABnzbd. For host (server) enter aunews.frugalusenet.com for NZ/Aus users (for international just remove the au at the start). Enter the username and password from step 1. Press advanced and change connections to 15 for a 100Mbps connection, 40 for a 300Mbps connection, or 150 for a 900Mbps connection. Press test and then Save. You can change the number of connections later under Server -> Show details -> Connections, you can also set a maximum speed under General -> Tuning -> Maximum line speed. Next it will ask to change the default folders. Change the temporary download folder to (I am using drive E: as an example for this) E:\homeserver\downloads\incomplete and the completed download folder to E:\homeserver\downloads\complete.
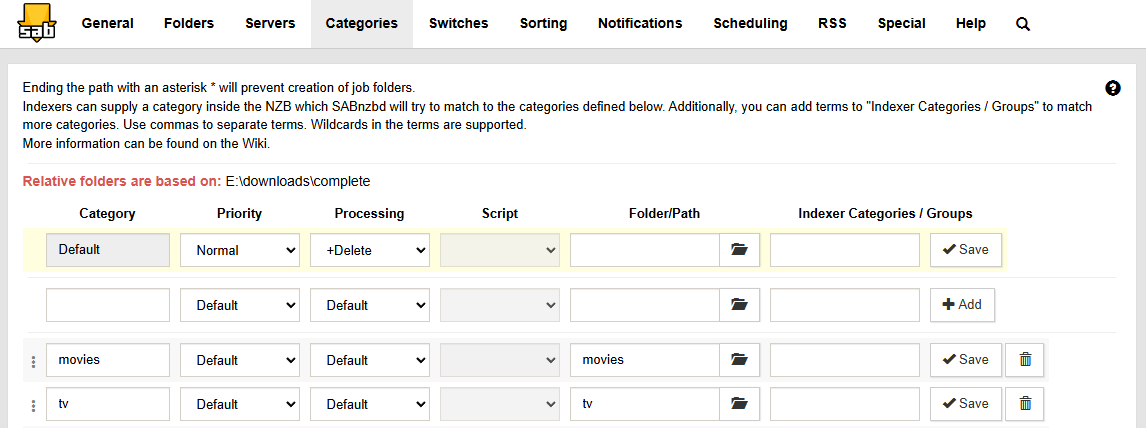
Under Categories in SABnzbd settings, under folder/path type movies for the movies category and press save, under folder/path type tv for the tv category and press save.
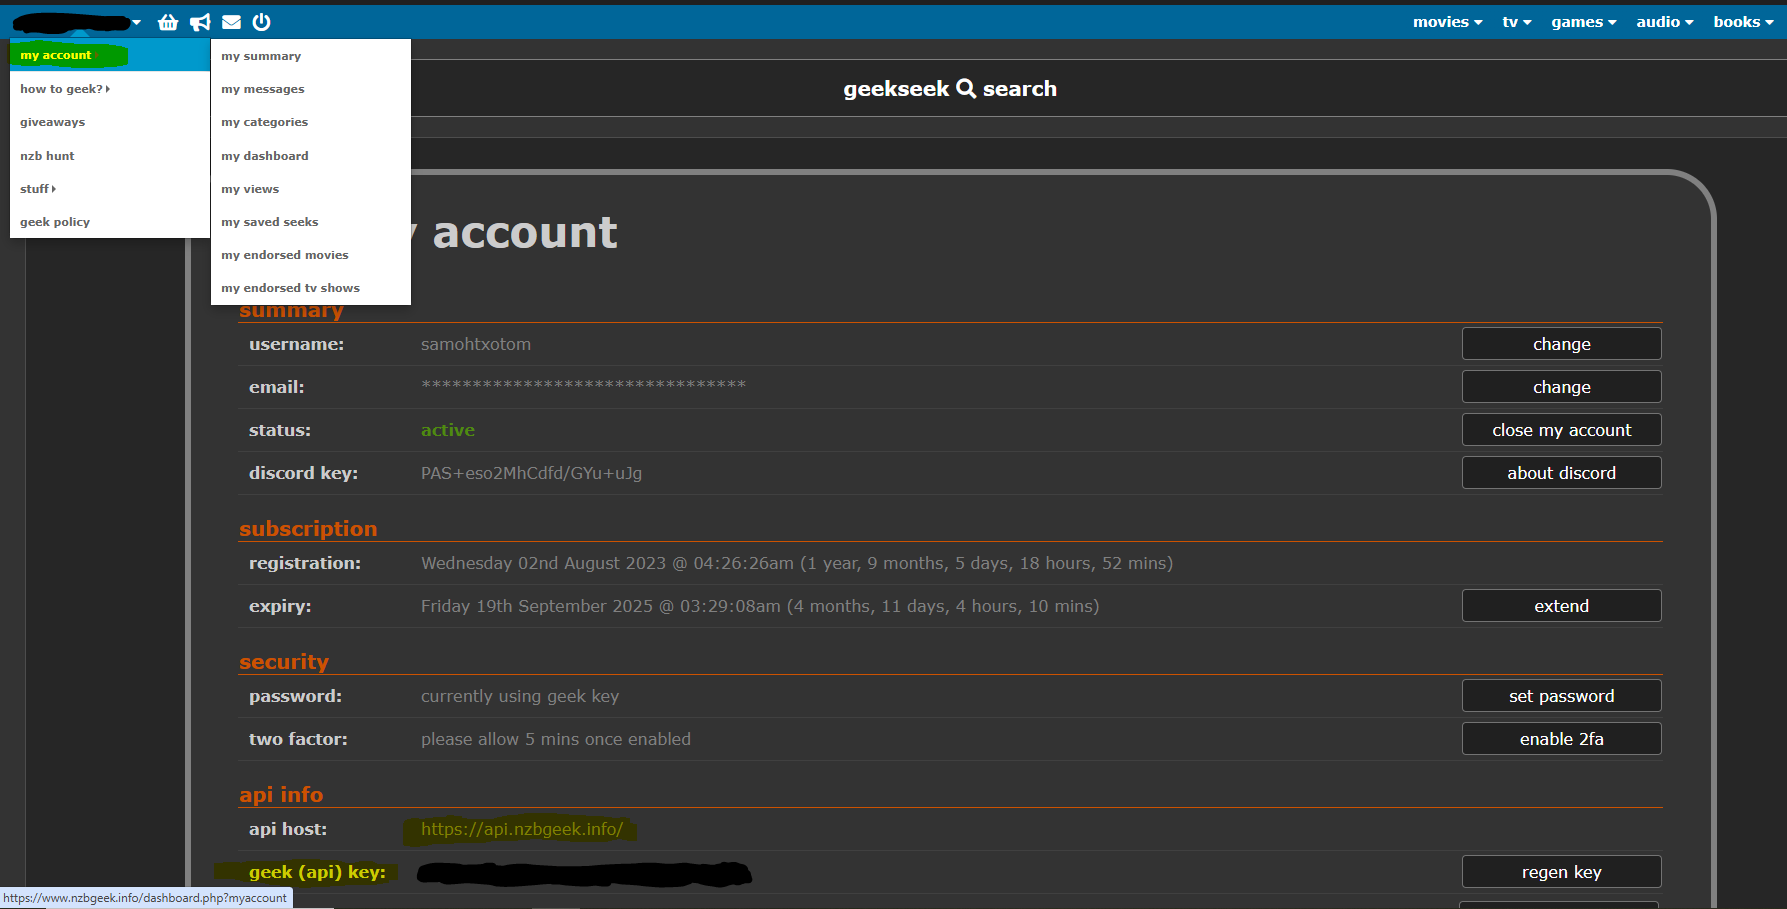
3) Next we need an indexer. This essentially finds the content on the providers server. Go to https://www.nzbgeek.info/ and sign up for a paid plan ($12USD per year). We will need the api key from your account for the later steps.
4) Now download and install Radarr. This manages your movies. https://radarr.video/ Change the startup option to “Create shortcut in startup folder”, for everything else keep the default options. During/after install you’ll get a windows defender popup, tick the box for private networks and press Allow. When Radarr opens after installing you’ll need to create a login (choose either option).
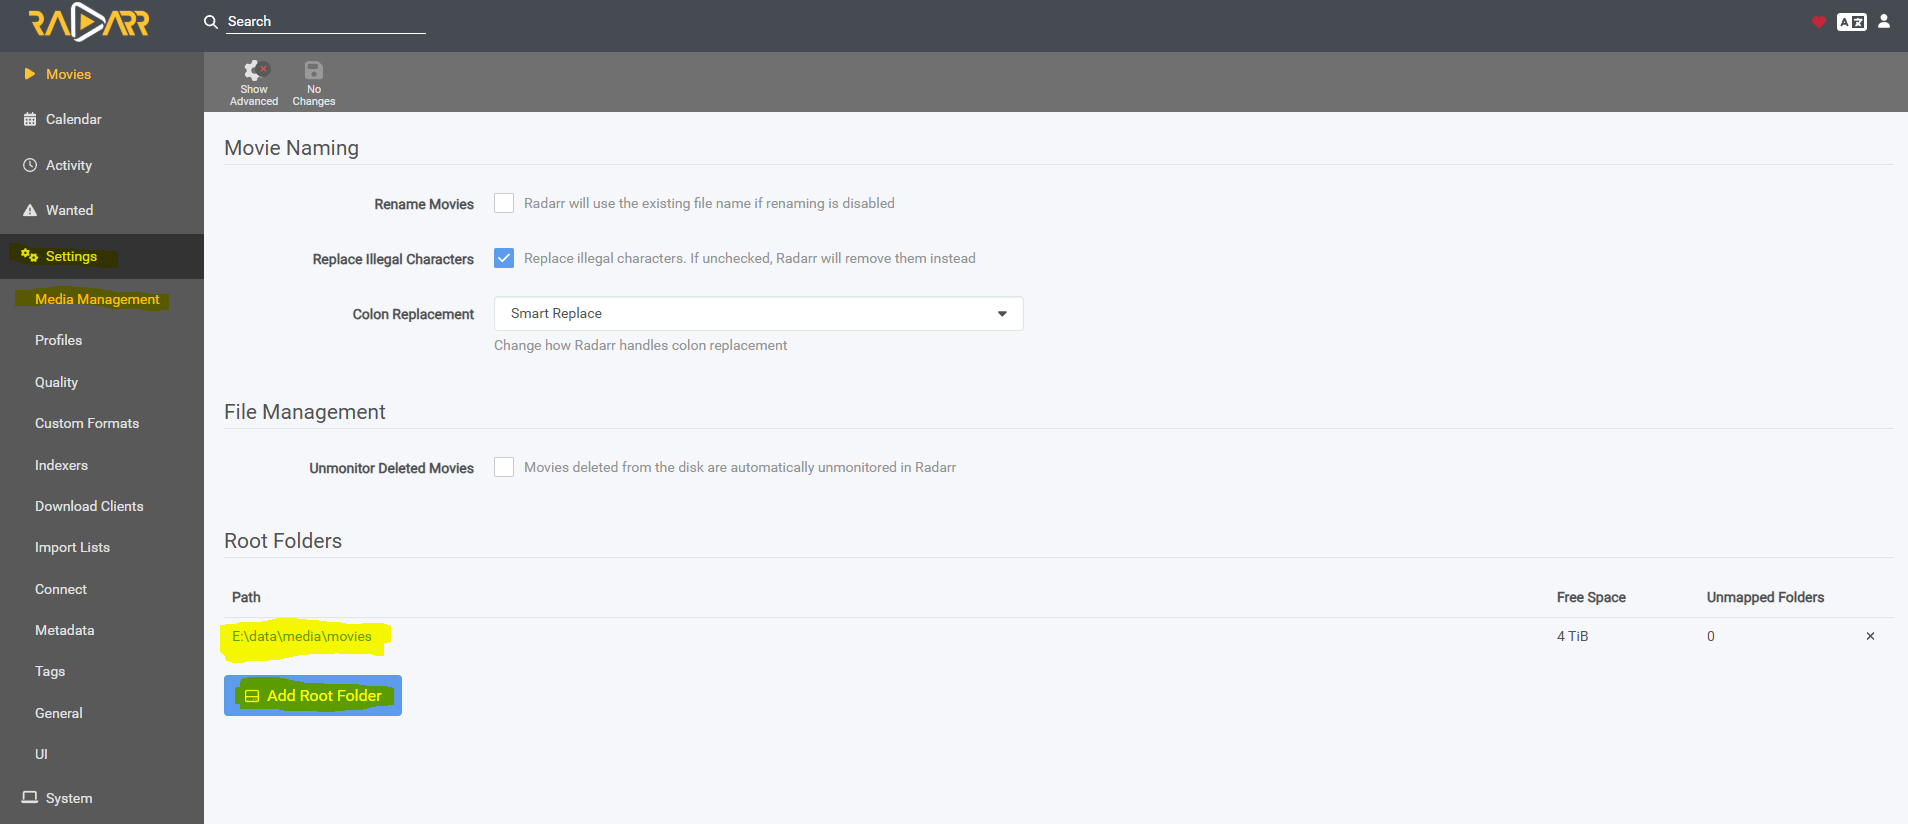
5) Under Settings -> Media Management, at the bottom press Add Root Folder and find the one you made earlier E:\homeserver\media\movies . This is the same folder you will point Plex to later.
Because Radarr and SABnzbd talk to each in the background, we don't need to tell Radarr where the download folder is, only where to move the file to once it has been downloaded.
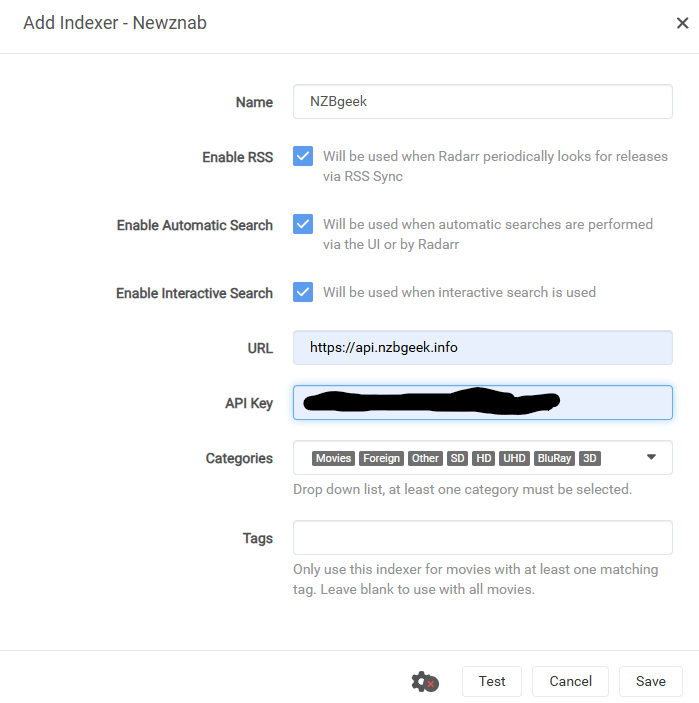
6) Under Settings -> Indexers, create new (big plus icon), under Usenet click on Newznab, change name to NZBgeek and add https://api.nzbgeek.info/ as the URL and then get the API key from step 3 and add that under API key. Press test and then save.
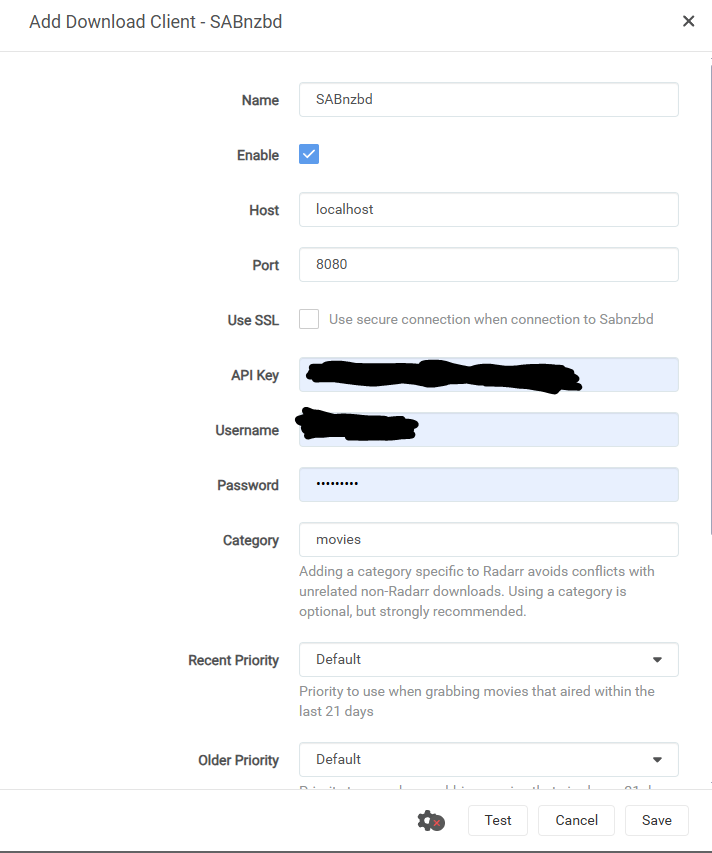
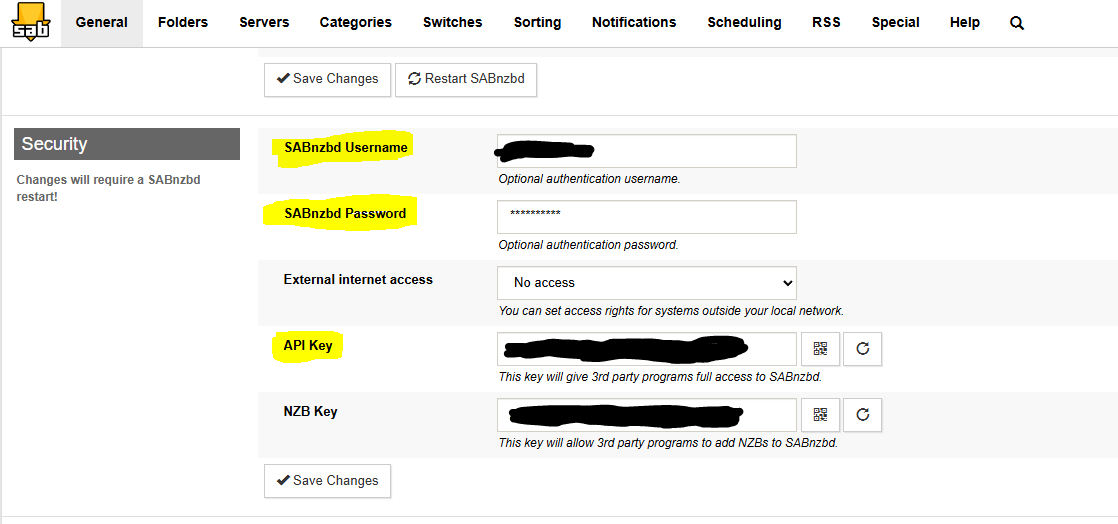
7) Under Settings -> Download Clients, create new, under Usenet add SABnzbd, copy the API key from SABnzbd under Settings -> General -> Security, if you setup a username and password for SABnzbd enter that as well, click test and then save.
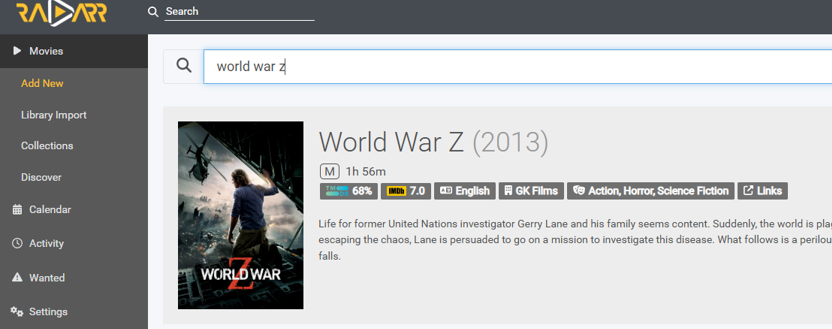
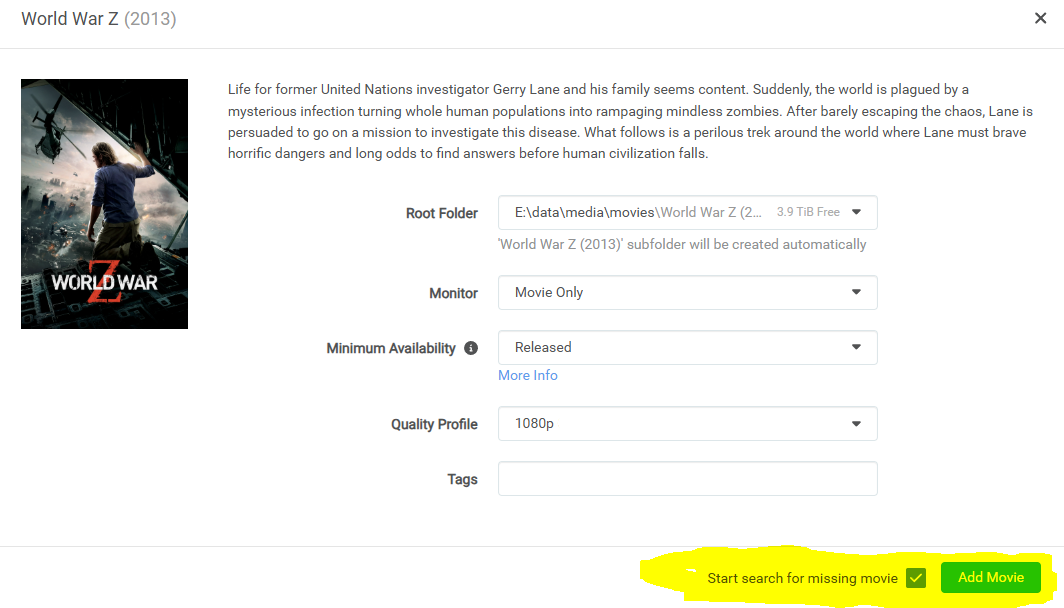
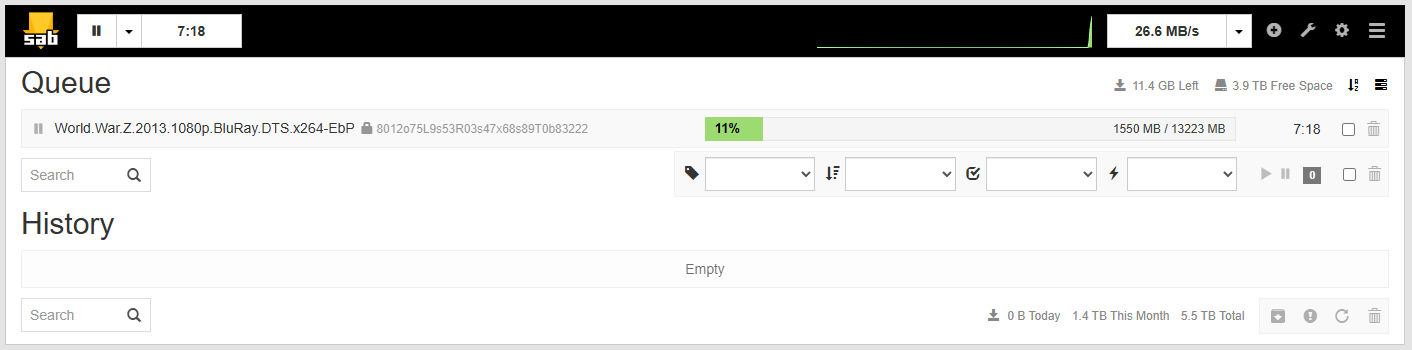
8) You are ready to do a test download! Go to Radarr (in your system tray) and on the left click on Movies -> Add New, search for a movie, select the quality you want, check the box for start search for missing movie and add it. It will search and then the download should appear in SABnzbd. A download may fail but Radarr will automatically retry another file. Once it’s finished Radarr should sort it into your folders. If your downloads are too big for your liking (say a 40GB 1080p movie) then you can go to Settings-> Quality and set limits.
9) Now download and install Sonarr. This manages your TV shows. https://sonarr.tv/ Change the startup option to “Create shortcut in startup folder”, for everything else keep the default options. During/after install you’ll get a windows defender popup, tick the box for private networks and press Allow. When Sonarr opens after installing you’ll need to create a login.
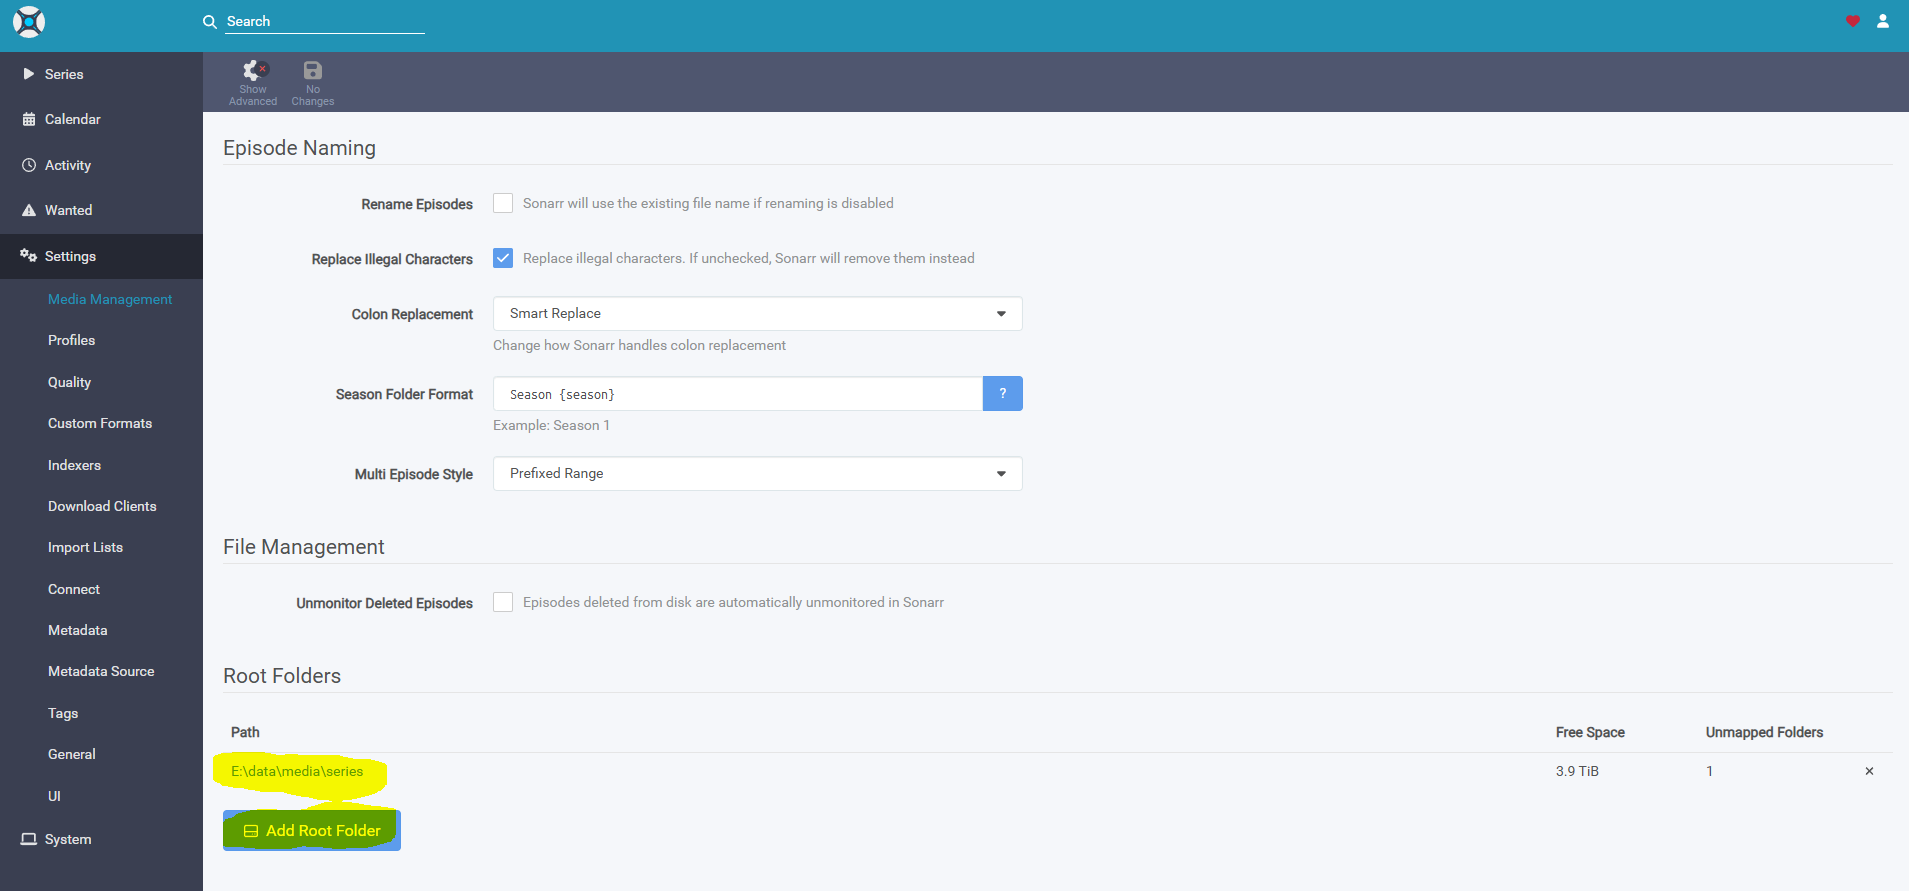
10) Under Settings -> Media Management, at the bottom press Add Root Folder and find the one you made earlier E:\homeserver\media\tv
11) Repeat steps 6 & 7 exactly (but this time in Sonarr)
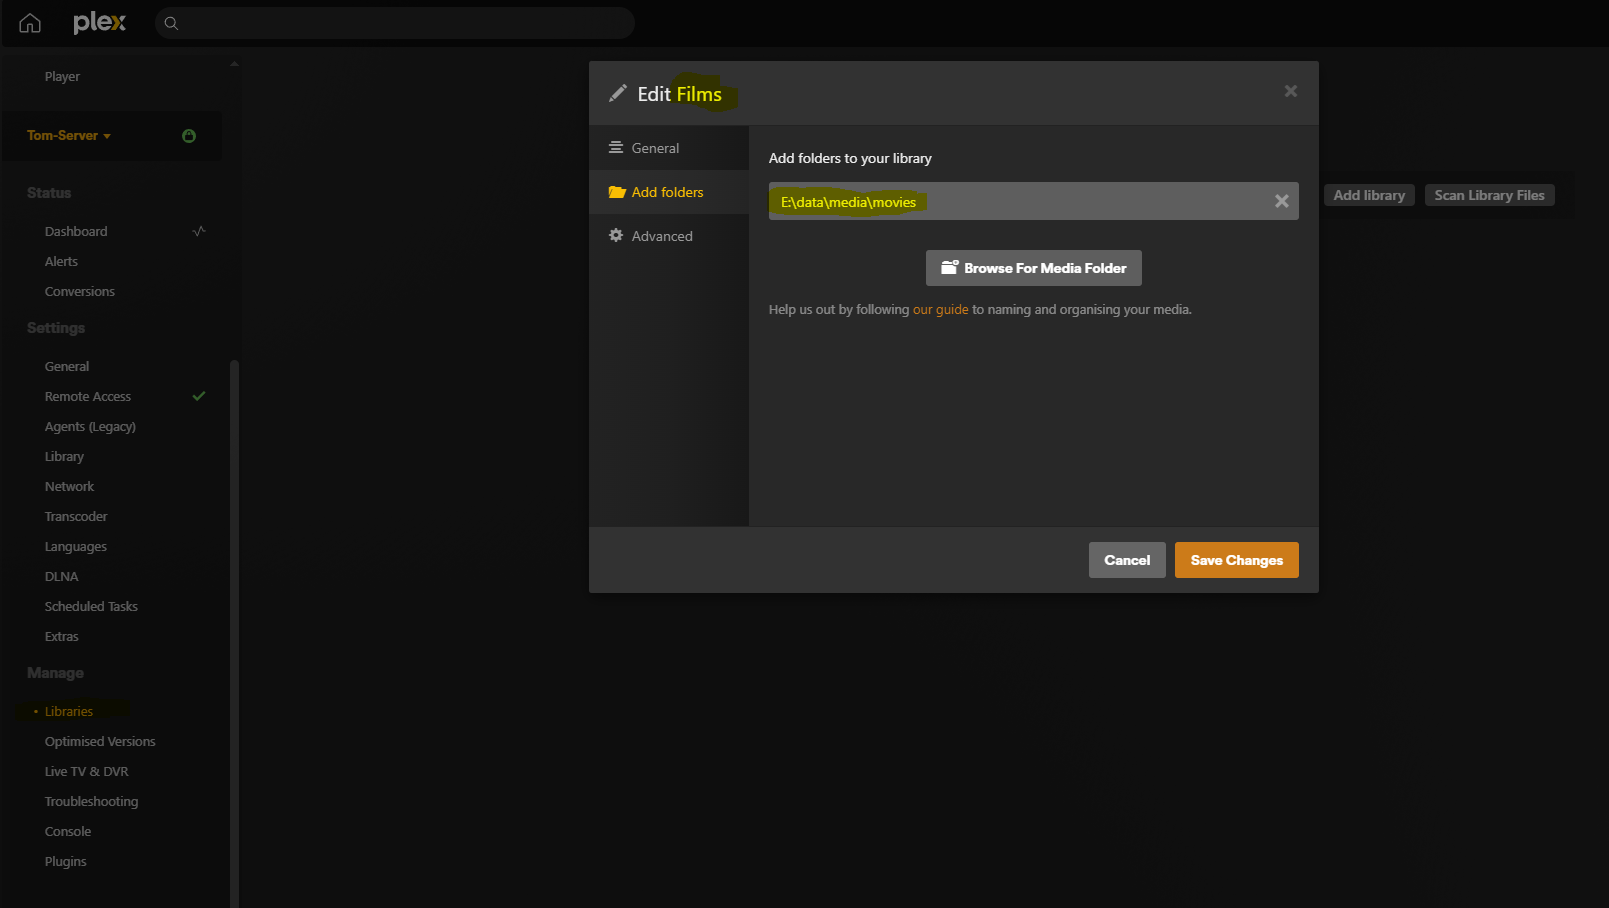
12) Now download and install Plex media server https://www.plex.tv/media-server-downloads/?cat=computer&plat=windows Login, and the server will initialise. On the server setup screen under the media library tab press Add library, Movies, browse to E:\homeserver\media\movies. Add another library, this time clicking TV and browsing to E:\homeserver\media\tv (this can also be accessed by clicking on settings and at the bottom go to Manage-> Libraries.
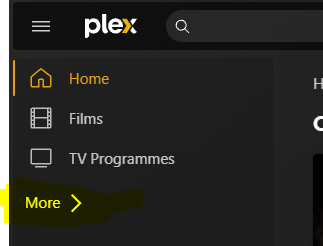
Done! Open Plex and see if your test download is there from earlier (click More on the left menu and your server should be listed with Films and TV Programmes, click on Films and then click on the Library tab). Apps are accessible through the icons in your tray.

You can maximise available content by adding two additional indexers for an additional approx. $48USD($80NZD) per year. As an example of the benefits of further indexers, I only had one indexer for a long time and never had any issues with content until I wanted all the seasons of Friends in 1080p but the one indexer couldn’t find a couple of the episodes in the first season in 1080p, only 720p, so I added a further indexer and was able to get them easily. You can start with the one above (NZBgeek) and add more if you're struggling to find more obscure content. I’d recommend altHUB and abNZB.
If you are having problems with subtitles, you can download and install Bazarr, a subtitle manager.
PAID - HIGHLY RECOMMENDED FOR ANDROID USERS - If you want to add content and manage this entire setup from your phone, you can get the NZB360 app and get the pro version for $10USD one-off and follow their instructions for setup. You can even manage remotely with Tailscale!
PAID - If you have a large media collection you can simplify your folder paths by getting StableBit DrivePool ($30USD one-off, free 30-day trial). This will create a single drive out of all your different drives. Without this it can be okay if you only have two drives as one can be for TV and the other for movies, but more than that and you must start managing where files go when they are downloaded. Not a huge issue (literally just one drop-down when you add content) but this is a good solution.
Enjoy!