Plex Server Sharing for Windows (Advanced)
This assumes you have already followed the basic tutorial.
This will expand your current Windows Plex server to be able to share with anyone else remotely, allow your users to add content at a custom domain, optimise for high quality releases, manage your library so you don’t have content wasting HDD space without being watched and get some cool statistic on your Plex server. After this process you’ll have a hands-off server that is truly as good as it gets.
A couple of limitations that may prevent you from doing this that you should check, the first is if your ISP uses CGNAT, this essentially means you don't have a unique public IP address and thus can't point to your server remotely. There are some workarounds for this, or an easy fix is getting a new ISP who doesn't us CGNAT or sometimes you can ask your current ISP for a public IP address. To see if you are under CGNAT look at your routers WAN/internet IP address and compare it to your public IP address at https://whatismyipaddress.com/ if they are different you are likely under CGNAT.
The other is that you need to be able to open ports on your router. If you have an ISP provided router these are often locked down and you might be unable to change advanced settings such as Port Forwarding. Check if you can find the port forwarding and DHCP reservation/static IP settings on your router, or just buy a new router.
A key part of this setup is installing Docker Desktop. This essentially sets up a Linux virtual machine and can run Linux images. We need this because some of the applications we want are not available as windows .exe's.
We will be installing
-Docker Desktop (run Linux apps)
-Overseerr (Plex users add content remotely)
-Nginx proxy manager (point your domain to your Overseer app)
-cloudflare-ddns (update public IP for non-static IP addresses)
-Profilarr (sets up quality profiles for the best releases)
-Maintainerr (manages library so you don't have unwatched content wasting HDD space)
-Tautulli (Plex statistics)
1. First install Docker Desktop https://docs.docker.com/desktop/setup/install/windows-install/ disable the use of WSL/enable Hyper-V at setup.
2. Setup folders on your C: drive (hopefully an SSD) as below
C:\serverdata\configs\duckdns
C:\serverdata\configs\maintainerr
C:\serverdata\configs\nginx-proxy-manager
C:\serverdata\configs\overseerr
C:\serverdata\configs\profilarr
3. Now we need a custom domain so your friends and family can have an easy way to add content. Purchase a domain (https://www.namecheap.com/ is good). Let's say I purchased yourcustomdomain.com, we'll get this setup throughout the rest of the tutorial.
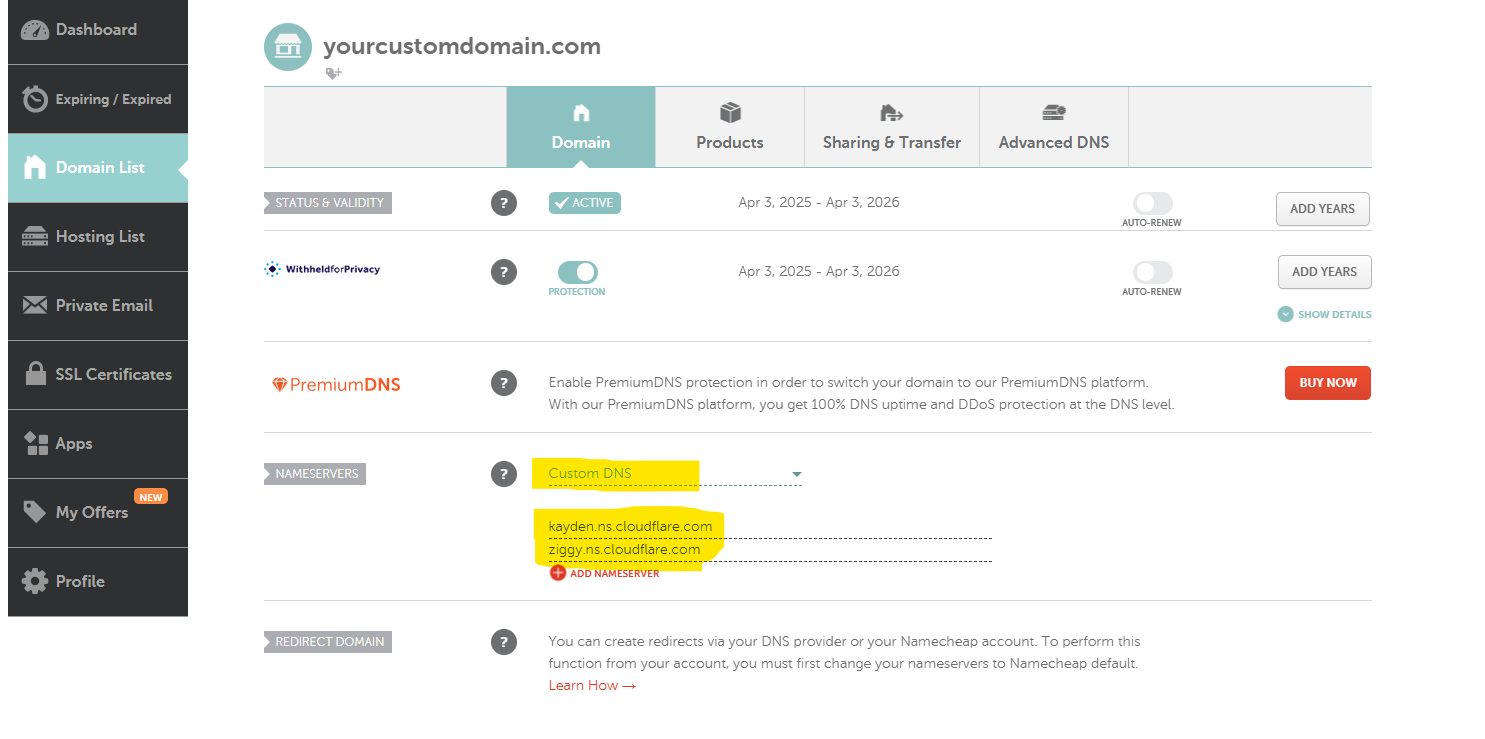
4. We need to setup a CloudFlare account as they will be our DNS manager, make an account and add your custom domain to CloudFlare, follow their instructions, they will give you two nameserver addresses, add these nameservers to your domain name provider (namecheap.com in above example).
5. Next is getting your API token from CloudFlare so your public address stays up to date on CloudFlare, this won't be exposed as we'll be using CloudFlare Proxy. Open CloudFlare and go to Cloudflare Profile -> API Tokens -> Create token -> Edit zone DNS (template) -> Under zone resources select include and then choose your domain -> Continue and save. Save the API key as we'll need it in the next steps.
6. Now we are going to use a docker-compose file to run all the apps except Tautulli which has a native windows app.
You will need to copy and paste and edit the below code.
I would recommend using Visual Studio Code or another code editor to edit this as the formatting can be ruined in basic text editors such as Notepad https://code.visualstudio.com/Download
services:
  overseerr:
    image: sctx/overseerr:latest
    container_name: overseerr
    environment:
      - TZ=Pacific/Auckland ### ***EDIT*** Change to your local timezone, choose from this list https://en.m.wikipedia.org/wiki/List_of_tz_database_time_zones
    ports:
      - 5055:5055
    volumes:
      - C:\serverdata\configs\overseerr:/app/config
    restart: unless-stopped

  nginx-proxy-manager:
    image: 'jc21/nginx-proxy-manager:latest'
    restart: unless-stopped
    ports:
      - '80:80'
      - '443:443'
      - '81:81'
    environment:
      DB_SQLITE_FILE: "/data/database.sqlite"
    volumes:
      - C:\serverdata\configs\nginx-proxy-manager\data:/data
      - C:\serverdata\configs\nginx-proxy-manager\letsencrypt:/etc/letsencrypt

  profilarr:
        image: santiagosayshey/profilarr:latest
        container_name: profilarr
        ports:
            - 6868:6868
        volumes:
            - C:\serverdata\configs\profilarr:/config
        environment:
            - TZ=Pacific/Auckland   ###***EDIT*** Same as above (overseerr)
        restart: unless-stopped

  maintainerr:
        image: ghcr.io/jorenn92/maintainerr:latest
        container_name: maintainerr
        volumes:
          - C:\serverdata\configs\maintainerr:/opt/data
        environment:
          - TZ=Pacific/Auckland   ###***EDIT*** Same as above (overseerr)
        ports:
          - 6246:6246
        restart: unless-stopped

  cloudflare-ddns:
      image: favonia/cloudflare-ddns:latest
      container_name: cloudflare-ddns
      read_only: true
      cap_drop: [all]
      security_opt: [no-new-privileges:true]
      environment:
        - CLOUDFLARE_API_TOKEN=xxxxxx-xxxxxxx-xxxxxxx  ###***EDIT*** Enter cloudflare API token from step 5
        - DOMAINS=yourcustomdomain.com,www.yourcustomdomain.com,bazarr.yourcustomdomain.com,prowlarr.yourcustomdomain.com,radarr4k.yourcustomdomain.com,radarr.yourcustomdomain.com,sabnzbd.yourcustomdomain.com,sonarr4k.yourcustomdomain.com,sonarr.yourcustomdomain.com,tautulli.yourcustomdomain.com ###***EDIT*** edit with your custom domain, if you only want overseer remotely you can just keep the first two and delete the rest
        - PROXIED=true
      restart: unless-stopped
Edit the following:TZ=Pacific/Auckland for NZ, otherwise choose from this list https://en.m.wikipedia.org/wiki/List_of_tz_database_time_zones under "TZ identifier".
For cloudflare-ddns edit the CLOUDFLARE_API_TOKEN with your token from step 5, and edit the DOMAINS to your custom domain. I have added all the services to my domain list so I can access them all remotely using NZB360, however if you just want Overseerr you can remove all except yourcustomdomain.com,www.yourcustomdomain.com
If you have setup the above folders then that should be all you need to change.
Save the file as docker-compose.yaml in your C:\serverdata folder
7. Ensure docker desktop is running. Now go into your C:\serverdata folder and click on the blank space next to your folder path and type cmd and press enter, it will open up the command prompt within the C:\serverdata folder. Type docker-compose pull and you should see it start downloading all the apps. Wait for it to finish, then type docker-compose up -d . You should get a bunch of popups requesting access to the folders you created earlier, click yes for each one. Sometimes you need to restart it for them all to run the first time. To do that type docker-compose down and wait for them to stop, then type docker-compose up -d again and they should boot successfully. In Docker Desktop settings change it so it starts when you sign in.
8. We need to open our Windows firewall to both our Plex server and our Proxy manager. To open ports on Windows go to Settings->Network & Internet->Your Current Connection (i.e. Ethernet)->Configure firewall and security settings->Advanced settings->Inbound Rules->New Rule
Rule Type = Port
TCP
Specific ports 80, 443, 32400
Allow all connections
Name Plex and nginx
To open ports on your router you will need to follow your specific routers guide. You need to set a DHCP reservation/local static IP for the computer you are running your server on, and then set port forwarding for TCP ports 80, 443 and 32400 to that IP address. This is usually a simple task once you find the settings in your router. See the warning at the start of the tutorial if you run into problems here.
9. Setup Overseerr, open Docker Desktop and under containers you should have a list of all the apps running, click on the port next to overseerr and it should open in your browser. Setup is relatively straight forward, link to your Plex server (use local secure connection), and link to your Sonarr and Radarr apps. Under settings -> General update your application URL to https://yourcustomdomain.com
10. Setup nginx proxy manager, in docker desktop click on show all ports and click on port 81, this will open up in your browser. Click on proxy hosts and add new, add your custom domain eg: yourcustomdomain.com as the domain name and enter your computers local IP address under Forward Hostname / IP (found in Windows under Settings->Network & Internet->Your connection type (eg: Ethernet)->IPv4 address), and port 5055 (which is overseerr). Turn on cache assets and block common exploits. Go to the SSL tab and click the dropdown and request new certificate, following the instructions, enable force SSL. Save. This is where you can add other services in addition to adding them in the cloudflare-ddns DOMAINS section in your docker-compose.yaml file. You can use the same certificate, just create subdomains like in my example in step 6.
All going well you should now be able to go to your custom domain and overseerr should open. If you haven;t received the email from CloudFlare saying your site is live then you'll have to wait for that.
11. Setup profilarr, under settings add both Sonarr and Radarr, Import the Dictionarry / Database, then under Profiles check which one you want and then press import, import to radarr and sonarr. I'd recommend the 1080p quality setting as it ensures good compatibility with players and looks good without being excessive on file size (i.e remuxes)
12. Setup maintainerr. Link to Plex, Sonarr and Radarr. Then import a new rule (use the community rules) for both movies and tv shows.
13. Allow exclusions in Windows Security. Settings -> Privacy and Security -> Windows Security -> Open Windows Security -> Virus & threat protection -> under Virus & threat protection settings click on Manage Settings -> scroll to the bottom and under Exclusions click Add or remove exclusions -> Add a folder exclusion for your E:\homeserver\media and E:\homeserver\downloads folder, you could also add your C:\serverdata folder and your C:\Users\yourusername\AppData\Local\Plex Media Server Plex databse
14. Install Tautulli https://github.com/Tautulli/Tautulli/releases and add your Plex server.
16. Finally go to your Plex server settings and under remote access press show advanced and then tick manually specify port, we will use the default 32400 port, press apply and it should give you the green tick.